Shaping Rails
Moderators: collnarra, PeepeelaPew, Butts, Shari
Shaping Rails
I did a bit of a search for this but couldnt seem to find anything. Ive started looking at getting into board shaping but one thing I dont get is how to shape the rails to get those perfect corners. Is there some specail tool that I can get? or is it just sanding it with sand paper till its perfect?

My advice to you SAS, as it is to anyone on the same path, get a hold of John Carper’s Shaping 101.
The bottom edge are done with a Surform or a special tool called ‘Fred’. ‘Fred’ is short Surform blades mounted on a piece of timber at opposing angles so it cuts both directions. The blades are mounted at 30 degrees (if I remember correctly). You can do the same with coarse sandpaper mounted instead of the blades. You will be left with a bevelled cut...
Once you have made your cuts from the bottom and the rail you refine with ‘screen’, sandpaper grit embedded on something like flyscreen and originally developed for plastering I believe. Screen is flexible and can be bent around the rail and dragged along the rail until you get the desired result. This is also why a lot of boards have a textured ‘screen line’ in the rails as it cuts fine lines.
The deck is done with a Surform, coarse sandpaper mounted on a hard backer or planer for the big removal of foam and sometimes dragon skin (a flexible metal sheet like a bloody cheese grater and can be a bitch to use - I avoid these days) then once again finished off with screen. You can fine it down with finer screen, sandpaper or the like, but it is more cosmetic than functional as the whole thing has to be ‘wrapped in plastic’.
Voila, rails done and dusted. Sounds so easy
I asked the libary if they would get Shaping 101 in but they said they have no interests in itric_vidal wrote:My advice to you SAS, as it is to anyone on the same path, get a hold of John Carper’s Shaping 101.
The bottom edge are done with a Surform or a special tool called ‘Fred’. ‘Fred’ is short Surform blades mounted on a piece of timber at opposing angles so it cuts both directions. The blades are mounted at 30 degrees (if I remember correctly). You can do the same with coarse sandpaper mounted instead of the blades. You will be left with a bevelled cut...
Once you have made your cuts from the bottom and the rail you refine with ‘screen’, sandpaper grit embedded on something like flyscreen and originally developed for plastering I believe. Screen is flexible and can be bent around the rail and dragged along the rail until you get the desired result. This is also why a lot of boards have a textured ‘screen line’ in the rails as it cuts fine lines.
The deck is done with a Surform, coarse sandpaper mounted on a hard backer or planer for the big removal of foam and sometimes dragon skin (a flexible metal sheet like a bloody cheese grater and can be a bitch to use - I avoid these days) then once again finished off with screen. You can fine it down with finer screen, sandpaper or the like, but it is more cosmetic than functional as the whole thing has to be ‘wrapped in plastic’.
Voila, rails done and dusted. Sounds so easy
Ive asked Paul Gravelle (Im not sure if people have heard of him out of South Australia) and he said he'd let me come in for a few days next time im over in penong.ric_vidal wrote:Sam,
It is worth it, a generally good reference source. Not the ONLY way to go about things but even JC admits to that.
Also, see if you can stick your head in with your local shaper and see if he doesn’t mind if you watch while he does some work.
You’ll learn plenty just by observing.
Yep, heard of him.SAsurfers wrote:Ive asked Paul Gravelle (Im not sure if people have heard of him out of South Australia) and he said he'd let me come in for a few days next time im over in penong.. Also just a quick question ive read it on a lot of other sites but still dont get it, when shaping the concaves you dont use a sand block right? what do you use? like how do you get that rounded shape in it?
Concaves - bit like anything else SAS, combination of Surform and sandpaper. A lot of guys when putting a double concave in around the tail will put masking tape down first to stop areas being touched. It is then a matter of smoothing/blending out the ridges/bumps after the tape is removed.
Keep in mind SAS foam is pretty easy to work.
My personal preference for shaping is mainly with 3 things (after using the plane for the rough work): small Surform, hard density foam (velco mounting) sanding block that will take a third of a sheet of sandpaper and a soft foam version for blending it all and more finished sanding. These blocks can can a variety of grits from coarse (40 grit) to fine and it is amazing how much a glass job hides so it doesn’t have to be superfine.
I will also use sandpaper mounted on lengths of timber to get good flat areas. You basically learn to adapt things like foam, wood, etc to form tools to achieve what it is you want to do.
Never done it SAS so couldn’t honestly answer... hard to explain but you MAY get too concerned with trying to copy instead of just making something that looks a feels right.SAsurfers wrote:Is it easy to copy a board?
See if you can get a 2nd blank or a reject preshape that won’t cost you a lot and you can have a dig at that.
Most definitely SAS, seconds for all sorts of reasons. You may not get them down your way as most of the blanks are manufactured in NSW or QLD. I’m literally 15 mins away from the suppliers so it isn’t an issue. Don’t know that there are any in SA. Ask Paul Gravelle when you see him if he knows where you can get one or he might even be able to get one in for you.SAsurfers wrote:Can you pick up 2nd blanks? I just spent 900 bucks on a new board today so I think ill leave the shaping for a couple of weeks
-
Beerfan
rails
Ric, thanks ( once again!! ) for sharing your experience , we only have one more stand to weld, and we'll be starting our egg. I made up a rubber template today, and drew it onto the board, lookin good already!!!!. We'll be basically following your advice for the rails, as well as jc's!.
P.S we must be keen, the drive to brookevale is a faaarken nightmare!!!!
P.S we must be keen, the drive to brookevale is a faaarken nightmare!!!!
Re: rails
Beerfan, I hope you got my PM with the dimensions, I seemed to be having problems sending it. If not it sounds like you’ve sorted it out regardless.Beerfan wrote:Ric, thanks ( once again!! ) for sharing your experience , we only have one more stand to weld, and we'll be starting our egg. I made up a rubber template today, and drew it onto the board, lookin good already!!!!. We'll be basically following your advice for the rails, as well as jc's!.
P.S we must be keen, the drive to brookevale is a faaarken nightmare!!!!
My experience is pretty limited, but I get a result! You’ll work it out and rest assured I change aspects of my procedure for shaping the deck rail all the time. Just whatever for you guys.
Brookvale, yes, there are times to go and times to avoid
Good luck and keep us posted
-
Guest
rails
Ric, didn't get the PM, but the dimensions are:
8'2" egg
Wide point 4' forward = 21 1/2
Nose width = 16 1/2
Tail width = 13.
Pintail.
The tail does look a little narrow, hope its not too narrow!!. Thickness will be fairly thick as a little beef never hurt anyone!!, were just planning on skimming the bottom and deck, shaping the rails, and then, glassing!!. One layer of 6oz on the bottom, and 2 layers 6oz on top. 8 inch "dolphin" in a finbos, and 2 fcs style side boxes that my shortboard side fins will go in.
Start next weekend. will update!!
Re: rails
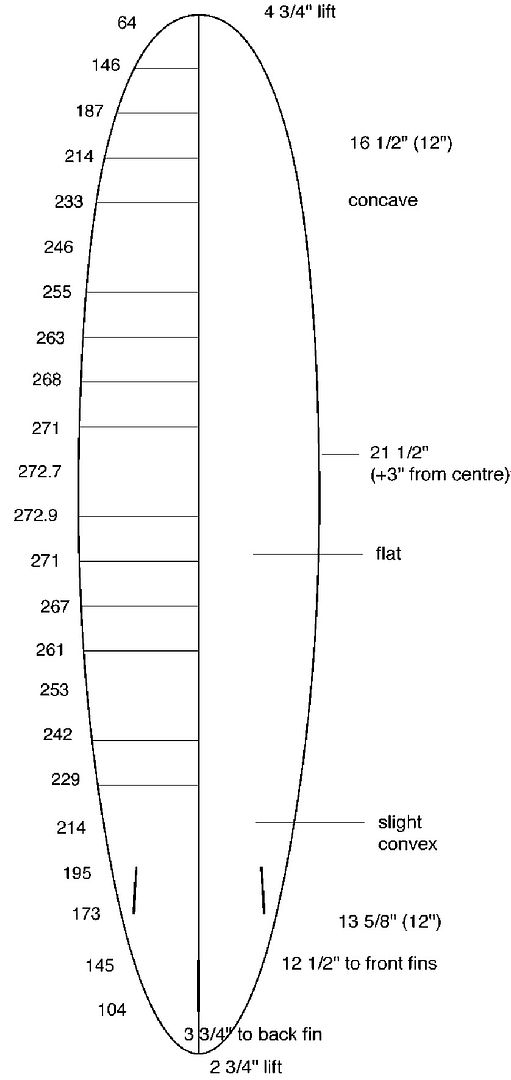
This was what I tried to send. Dimensions at 4" intervals, starting from the tail. Width measurements are mm and you may get the odd one that doesn’t look right if you were to join it up. Just smooth out any that look wrong. Your dimensions sound pretty close, but this board is 7' 8 3/4". Fin positions will vary as this is strictly a thruster.Anonymous wrote:Ric, didn't get the PM, but the dimensions are...
You will need to foil your blank at the nose and tail as that is where all the extra thickness is for customising. Take your volume off the bottom and you’ll be sweet. Keep in mind resin/glass adds a bit to your thickness so what may look thin-ish around the nose/tail always bulks up.
Re: rails
The 3 3/4" is to the trailing edge of the back fin, BUT that is a total thruster set-up i.e. all small fins. If you are going for a 2 + 1 (2 small, 1 large) set-up it would be different and depends on the width of the tail generally, as you said yours is fairly narrow, I’d position the box at 6" from the tail to the back end of the box.Beerfan wrote:Thanks ric, the measurements to the fins from the back, does that mean 3 and 3/4, from the tail, to the end ( closest to the tail ) of the finbox??. Also, what is the best way to put a concave in the bottom of the board, and how wide and deep do they roughly have to be??.
Concave you can do with a Surform if your taking a fair bit otherwise coarse sandpaper (36-40grit) and finish with ya finer stuff. You can keep your concave pretty slight, like 3-5 mm for a nose. If you are trying to put an oval type shape of concave you can mask the shape first, then remove the tape and blend it with the surrounding surface.
Reality is BF you can do everything just with sandpaper, if that is your budget, it just takes a little longer but that is no big deal, except to take down the stringer you must have a baby block plane or spokeshave as you are shaving down wood.
Biggest trick BF is keeping your stringer nice and flat so it isn’t a lump in your board if you run your hand across it. Foam is shaped easily, but leaves a ridge at the stringer. Taking down the stringer involves using the tiny block plane, or similar, so I hope you acquired one as they are fairly essential.
Who is online
Users browsing this forum: No registered users and 53 guests